Featured

Behind the “utils diagnose test”

The “utils diagnose test” command can provide us with an overall system status. From it we can check if there is an issue with the Tomcat Service, DNS / DNS lookup or even if there is an NTP issue.
Sometimes while troubleshooting or doing a “health check” of our systems we get the following output
ddddd

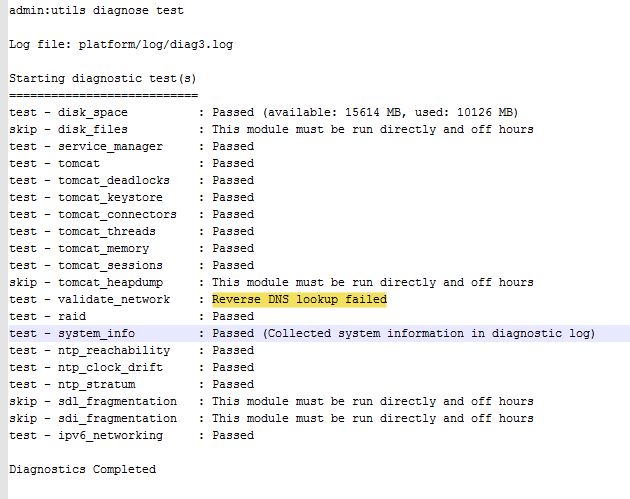
Our Network Team/Net Admin tell us “Everything is good from our side” , “It most be an issue with the CCX Server” but is it? Isn’t the error a little bit straighforward?

Let’s start by defining what “Reverse DNS” is:

Reverse DNS is a mapping from IP address to Domain Name. The opposite of Forward DNS (normal) which maps domain names to IP addresses.

For example:

The Forward DNS for “ccxguru.com” pointing to IP Address “7.7.7.7” not necessarily means that the reverse DNS for IP “7.7.7.7” points to “ccxguru.com”.

So what happens behind the scenes when you run the “utils diagnose test” specifically on the “validate_network” component.

  1. UCCX sends standard query using FQDN
  2. DNS Server reply’s back
  3. UCCX sends reverse standard query
  4. DNS Server reply’s back

How does that look on a pcap?

good

  1. Query sent using FQDN “uccx116pub.lab.ccipcc.com”
  2. DNS replies with the IP Address “mapped” to that domain.
ddddddddd.png


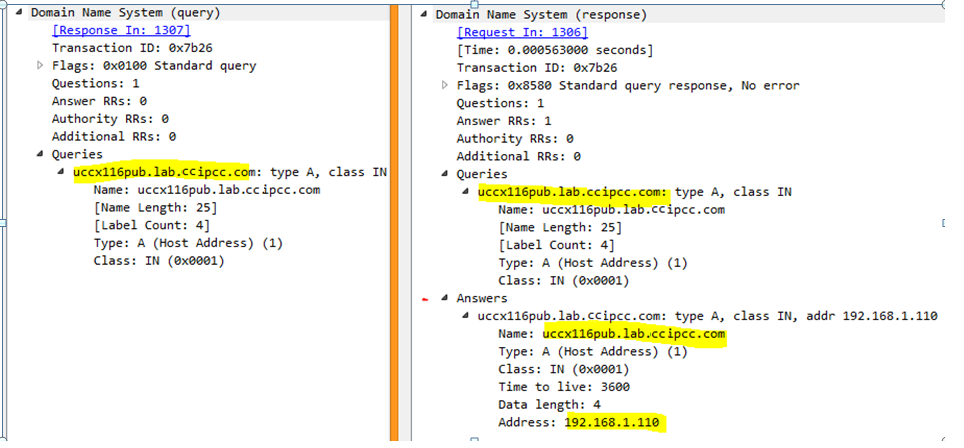
3. Query sent using reverse standard query “110.1.168.192”

4. DNS replies with the Domain “mapped” to that IP Address”
ssss
What happens when the “Reverse DNS” is incorrectly configured or not configured at all?
vvvv
And we get the error message on the “utils diagnose test” command.
Featured

Creating ODBC connection with UCCX

UCCX provides three different users that can be used to access the database directly in order to extract information for the purposes of wallboard applications, Quality Management, Workforce Management, and custom historical reporting.

  • uccxhruser: This user has access to many configuration and historical tables in the UCCX database and should only be used only for custom historical reporting and Cisco Unified Workforce Management (WFM).
  • uccxworkforce: This user has access to the Team, Resource, and Supervisor tables and it’s used for Cisco Unified Quality Management (QM).
  • uccxwallboard: This user has access to real-time database tables that contain snapshots of real-time statistics, specifically to tables RTCSQsSummary and RTICDStatistics.

For the purpose of this configuration we are going to use the uccxhruser.

Configuration

  1.  First we need to download the IBM Informix Client SDK that will allow the client to establish the ODBC connection with the CCX DB. You can find the latest SDK directly from the IBM website but you will find an unpleasant registration process. In order to keep things simple you can download the IBM Informix Client SDK Install 4.10 TC7 right here, remember to run the installer executable with windows “admin” rights. By default 64 bit Windows runs the ODBC Administrator Utility 64 bit instead of the the one that we just installed (32 bit), this causes the IBM INFORMIX ODBC DRIVER  option NOT to be visible, you can find the ODBC Administrator Utility 32 bit at ‘C:\Windows\SysWOW64\odbcad32.exe‘.

1

2.  Now we will create a new “DSN” based on the information  below:

2.JPG

  • Server Name: This is the name of the instance of the Informix database. There are specific rules for entering the name and they have to be followed:
  1. All upper-case letters to be converted to lower case
  2. Any hyphens to be converted to underscore
  3. If the hostname of the UCCX begins with a number, add “i” in fornt of it.
  4. Add “_uccx” to the end of the hostname.

For example:

Hostname: UCCX116PUB = Servername will be “uccx116pub_uccx”

Hostname: UCCX116PUB-1 = Servername will be “uccx116pub_1_uccx”

Hostname: 1-uccx116pub. The servername will be “i1_uccx116pub_uccx”

  • Hostname: The actual hostname or IP address of the UCCX
  • Service: 1504
  • Protocol: onsoctcp
  • Options: leave it blank
  • Database name: db_cra
  • UserID: The wallboard user or uccxhruser
  • Password: Password of the username (reset from the password management page)

4

3

  • Client Locale: en_US.UTF8
  • Database Locale: en_US.UTF8

3. Click on “Apply and Test Connection” and ensure the connection is successful.

6

There are many clients available on the web, on this guide I will use the Server Studio from AGS which is a free client and you can download it here.